

Table of Contents
There’s something magical about the scent of fresh bread baking in your kitchen. It brings warmth, comfort, and pride. Peasant bread is more than just a loaf; it’s a tradition passed down for centuries.
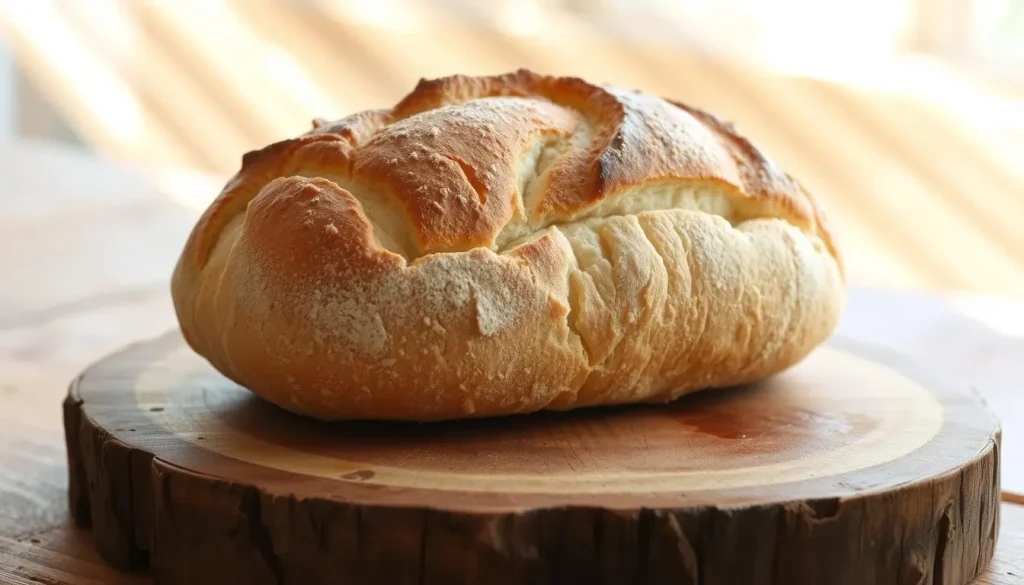
Whether you’re new to baking or love to try new things, this peasant bread recipe is for you. It’s easy to make and requires just a few ingredients. You’ll get a rustic loaf perfect for dipping, toasting, or with soups and cheese.
Imagine pulling a golden-brown, crusty loaf from your oven. It’s ready to pair with your favorite meals. This recipe needs no fancy tools or years of experience.
It celebrates simplicity and connects you to a tradition that has fed generations. Let’s make your kitchen a bread-baking haven, step by step.
Key Takeaways
- Peasant bread uses just four core ingredients, making it a simple bread recipe anyone can master.
- No kneading or special equipment needed—this recipe prioritizes ease and accessibility.
- Perfect for pairing with soups, dips, or cheese, enriching everyday meals with homemade flavor.
- Works for both beginners and seasoned bakers looking for a reliable, rustic loaf.
- Learn tips to ensure success, from rising time to storage tricks, in this detailed guide.
What Is Peasant Bread and Why You’ll Love Making It
Peasant bread is a timeless creation that’s simple and practical. For centuries, it has been a staple for families around the world. It uses just a few ingredients to make a nourishing loaf. Today, this simple bread recipe is loved for its ease and rich, earthy flavor.
The Rich History of Peasant Bread
Peasant bread started in rural communities. It was made from whatever grains were available—rye, barley, or wheat. It was a symbol of survival, feeding laborers with minimal resources.
Over time, its humble beginnings turned into a cherished tradition. It’s celebrated for its honesty and authenticity.
Benefits of This No-Fuss Bread Recipe
Why choose this recipe for peasant bread? It’s easy and doesn’t need special skills or equipment. The dough rests overnight, improving flavor while you sleep.
Plus, it’s adaptable. You can swap flours, add seeds, or try different toppings without fear of failure.
What Makes This Recipe Different
Its minimalist approach is its strength. No kneading or high-tech tools are needed—just patience. The long rise makes the bread airy and crusty.
Even beginners can make it on their first try. It’s a great way to build baking confidence.
This recipe is perfect whether you’re craving comfort food or want to get back to baking’s basics. Ready to try it? Let’s get started.
Essential Ingredients for Your Peasant Bread Recipe
Every great loaf starts with the right ingredients. For peasant bread, simplicity is key. Here’s what you’ll need:
- Flour: For structure and texture, use all-purpose or bread flour. Bread flour’s higher protein content creates a chewier crust.
- Active dry yeast: This bread recipe active dry yeast drives the rise, so store it properly and test its viability if unsure.
- Salt: Enhances flavor and regulates yeast activity—don’t skip it.
- Water: Warm (not hot) water activates yeast; adjust temperature to 105–110°F for best results.

“Yeast is the soul of bread—it needs warmth and food to thrive.” – Master Baker’s Handbook
Optional additions like olive oil or herbs add depth, but stick to basics first. Always measure flour by weight for accuracy; avoid scooping directly from the bag to prevent excess flour. For gluten-free diets, look for certified gluten-free flour blends. Active dry yeast can be substituted with instant yeast, but follow package instructions for activation differences. Quality matters: fresh ingredients ensure a better rise and flavor.
Remember, the bread recipe active dry yeast requires care—discard expired yeast and activate it first to test viability. Now you’re ready to gather supplies and move to the next step!
Kitchen Tools and Equipment You’ll Need
Baking bread recipes need simple tools, but the right equipment makes your loaf perfect. You can get rustic results with items most kitchens have.
In peasant kitchens, necessity was the mother of invention.

Must-Have Baking Vessels
A Dutch oven traps steam for a crackling crust. You’ll also need a mixing bowl for dough and a rimmed baking sheet. Cast iron skillets, like Lodge’s line, are great if you don’t have a dedicated bread baker.
Optional Tools That Make Baking Easier
- Bench scraper for clean dough handling
- Proofing baskets to shape loaves
- Bread lame (lame is French for blade) for scoring dough
Substitutions for Specialized Equipment
If you don’t have a Dutch oven, use a roasting pan with a lid. Add a preheated cast iron skillet with boiling water for steam. A clean kitchen towel dusted with flour works as a proofing basket.
Peasant bread’s charm is in its simplicity. Focus on quality ingredients and patience, not perfect tools. Every kitchen has what you need for your next baking adventure.
Step-by-Step Instructions for Foolproof Peasant Bread
Learning no knead bread recipes is easy. Just follow these steps to make a delicious rustic loaf.
Mixing Your Dough
Start by mixing flour, water, salt, and yeast in a bowl. Stir until there’s no dry flour left. Then, cover it and let it rest for 20 minutes. Remember, a wooden spoon works best here—no need for a mixer!
“Patience in mixing builds flavor in the dough.” – Bread Baking Guide
The First Rise: What to Look For
Let the dough rest for 12-18 hours at room temperature (68-75°F). Watch for bubbles on the surface. This shows fermentation is happening.
| Room Temp | Optimal Rise Time |
|---|---|
| 65°F | 16-20 hours |
| 75°F | 12-14 hours |
Shaping Your Loaf
Gently fold the dough into a round shape. Use floured hands to make a tight exterior without overworking. Place it in a floured cloth-lined bowl, seam-side down.
The Second Rise and Baking Process
Preheat your oven to 450°F with a Dutch oven inside. Before baking, score the top to let it expand. Bake for 30-35 minutes until the crust is golden. Use baking bread recipes tips for the best results.
- Steam the oven by adding a pan of water
- Check doneness by tapping the bottom—hollow sound means it’s done
Troubleshooting Common Issues With Your Bread
Start by testing yeast viability. Mix 1 tsp yeast with warm water (110°F) and ¼ tsp sugar. Wait 10 minutes—if it doesn’t foam, discard and use fresh yeast.
- Dense crumb: Overkneading or cold dough traps air. Let dough rest at 75°F to activate yeast properly.
- Burnt crust: Lower oven temp to 450°F and cover the loaf halfway through baking.
- Undercooked center: Extend bake time by 5-10 minutes. Check doneness with a thermometer (internal temp 190-210°F).
Humidity or altitude? Adjust the recipe for peasant bread by reducing the liquid by 2 tbsp at high altitudes. For humid climates, use ¼ cups less water. Store leftover yeast in an airtight container—freezer-safe for long-term storage.
Pro tip: Use a Dutch oven to mimic a bakery’s steam environment. If your dough collapses during shaping, let it rest 10 more minutes before handling. Small imperfections are normal—peasant bread thrives on rustic charm, not perfection. Every mistake teaches you how to balance time, temperature, and ingredients better next time.
Delicious Variations to Try With This Simple Bread Recipe
Find out how to make your simple bread recipe into something special with these simple changes. Whether you like savory, hearty, or sweet flavors, these tips help you make your loaf unique without making it hard.
Herb and Garlic Peasant Bread
Add 2 tablespoons of minced fresh rosemary or thyme to the dough when mixing. For a strong garlic taste, blend roasted cloves into the water before mixing. Try a mix of dried oregano and parsley for a Mediterranean flavor. Let the dough rise uncovered to let the herbs blend into the bread.
Whole Wheat and Multigrain Options
Use up to 50% whole wheat flour instead of all-purpose flour. Add 2 tablespoons of water for each cup of whole wheat. Mix in 1/2 cup of sunflower seeds, flax, or oats after kneading. Expect it to take about 30 minutes longer to rise, making it denser.
Sweet Variations for Breakfast
Make your loaf into breakfast bread by adding 1/4 cup of honey, maple syrup, or brown sugar. Mix in 1/2 cup of dried cranberries or chopped walnuts. For cinnamon rolls, roll the dough with cinnamon-sugar before shaping. Slice warm loaves with butter for a tasty breakfast.
These changes keep the simple bread recipe easy while exploring different flavors, like Italian herb focaccia or German multigrain loaves. Feel free to experiment—these changes stay true to the original recipe’s simplicity.
Storing and Freezing Your Homemade Bread
Keeping your bread fresh is important. The right storage keeps your peasant bread moist and crisp. Here’s how to keep it fresh, whether you bake today or later.
Short-Term Storage Solutions
Don’t use plastic wrap. It makes bread soft and soggy. Try these instead:
- Wrap in a clean kitchen towel or linen cloth.
- Place in a paper bag or airtight container lined with parchment.
- Use a bread box to keep loaves at room temperature for up to 2 days.
Freezing Methods for Long-Term Freshness
Freezing keeps flavor for up to 3 months. Follow these steps:
- Let bread cool completely before wrapping.
- Wrap tightly in parchment paper, then aluminum foil.
- Thaw at room temperature for 2 hours before serving.
Reviving Day-Old Bread
Make it fresh again with these tips:
- Steam-revive: Wrap in a damp towel, microwave 15 seconds, then bake at 350°F for 5–10 minutes.
- Toast slices for a crispy finish.
Peasant bread’s dense texture freezes well. Adjust methods based on when you’ll bake again from baking bread recipes.
Perfect Pairings: What to Serve With Your Freshly Baked Loaf
Make your recipe for peasant bread even better by pairing it with the right dishes. This bread’s thick texture is great for soaking up flavors. It’s perfect for dips, toppings, and meals.
Pair your loaf with:
- Rich tomato-based soups like minestrone or lentil soup
- Simple spreads like garlic-infused olive oil and coarse salt
- Grilled vegetables or roasted red pepper hummus
| Meal | Pairing Idea | Cultural Note |
|---|---|---|
| Breakfast | Toast with almond butter or honey | In Mediterranean regions, olive oil and rosemary are traditional. |
| Lunch | Warm bean soups or pâté | Historically paired with stews in Tuscan cuisine. |
| Snacks | Bruschetta topped with fresh basil and tomatoes | A classic Italian appetizer using day-old bread. |
For dinners, tear chunks into hearty stews or serve as a base for smoky grilled eggplant. Its sturdy crust is also great for cheese-stuffed slices. Try drizzling with balsamic glaze or pairing with sharp cheddar. The recipe for peasant bread is a versatile canvas for any meal.
Why This No Knead Bread Recipe Works for Beginners and Experts Alike
The no-knead method makes homemade bread easy for everyone. It uses science to get great results without the guesswork. This method turns baking into a simple, hands-off process that anyone can do.
“The secret to great bread isn’t strength—it’s time.” — Jim Lahey
Time-Saving Benefits
No-knead bread recipes save 50% of prep time. Traditional methods require constant kneading and timing. This method uses a slow rise, letting the dough develop naturally. You mix the ingredients once and wait.
Consistent Results Every Time
Science guarantees success. Gluten forms during the 12-18 hour rest. Fermentation creates an airy crumb and flavor without manual shaping. No more failed loaves from rushed steps.
Building Your Baking Confidence
Mastering this recipe builds skills for advanced baking. You learn about hydration levels, oven spring, and proofing. These basics apply to sourdough, rye, or seeded loaves.
No knead bread recipes show that less effort means more success. Start here, then try flavored versions or whole grains. Your kitchen becomes a lab for perfect loaves every time.
Conclusion: Your Journey to Homemade Peasant Bread Starts Now
Peasant bread is loved for its simplicity. This simple bread recipe needs little effort and no fancy tools. It’s easy for anyone to make, whether you’re new to baking or have lots of experience.
This recipe is flexible. You can change it up with different herbs, grains, or sweeteners. Even small mistakes won’t stop you. You’ll learn and improve with each try. Sharing and storing your bread is easy, keeping every slice fresh and every loaf shared.
It’s time to start baking. Get your flour, water, and yeast ready. Follow the steps, trust the dough, and enjoy the smell of your homemade bread. Peasant bread is more than food—it connects you to history and celebrates simple ingredients. Bake with confidence, try new things, and feel proud of your homemade creation.
FAQ
What is peasant bread?
Peasant bread is rustic, simple, and made with minimal ingredients. It comes from working-class origins and has a dense texture and hearty flavor.
This bread is versatile and pairs well with many foods. It’s a beloved staple in home baking.
Is it difficult to make peasant bread?
No, it’s not hard at all! This bread recipe is simple and easy for all bakers. With basic ingredients and the no-knead method, you can make delicious homemade bread without complex techniques.
Can I use active dry yeast in this bread recipe?
Yes, active dry yeast works perfectly in this recipe. Make sure to activate the yeast by dissolving it in warm water before adding it to your dry ingredients. This step is key for a successful rise.
How do I know if my bread has risen enough?
Check if your dough has doubled in size during the first rise. A good test is to gently press your finger into the dough. If the indentation remains, it’s ready for shaping. If it springs back, it needs more time to rise.
What tools do I need to bake peasant bread?
You’ll need basic kitchen tools like mixing bowls and measuring cups. You’ll also need a baking vessel, such as a Dutch oven or bread pan. Optional tools, like a bench scraper or a proofing basket, can enhance your baking experience but are not essential.
Can I freeze peasant bread, and how should I do it?
Yes, you can freeze peasant bread. Wrap it tightly in plastic wrap or aluminum foil, and store it in a freezer bag for up to three months. When ready to eat, thaw it in the refrigerator or at room temperature. Refresh it in the oven for a few minutes.
What ingredients can I use to customize my peasant bread recipe?
To add variety, include herbs, garlic, or different flours like whole wheat or multigrain. Sweet variations can be made by adding nuts, dried fruits, or spices. Adjustments to water content may be needed to maintain the dough’s consistency.
What are common problems when baking bread and how can I troubleshoot them?
Common issues include dough not rising, density, or uneven baking. To troubleshoot, ensure that your yeast is fresh and activated properly. Pay attention to dough handling and monitor your oven temperature. Each of these factors plays a significant role in successful baking.